
Corona Designs is introducing its Raspberry Pi Camera Trigger — a simple camera trigger device to interface directly with Raspberry Pi’s GPIO header. This allows for the Raspberry Pi to automatically control any camera compatible with a standard remote shutter release. This device is useful for creating computer-controlled timelapse photography, stop motion photography, or other remotely controlled or automatic photography based on other user or timer events.

Corona Designs’ Raspberry Pi Camera trigger is small, and fits in most, if not all Raspberry Pi cases. A hole may need to be created in the case to allow the interface cable to exit. An optocoupler is used to isolate electrical signals between the Raspberry Pi and the camera. So there are no worries of any weird signals or voltages a!ecting your expensive camera gear.
Universal Option Also Available
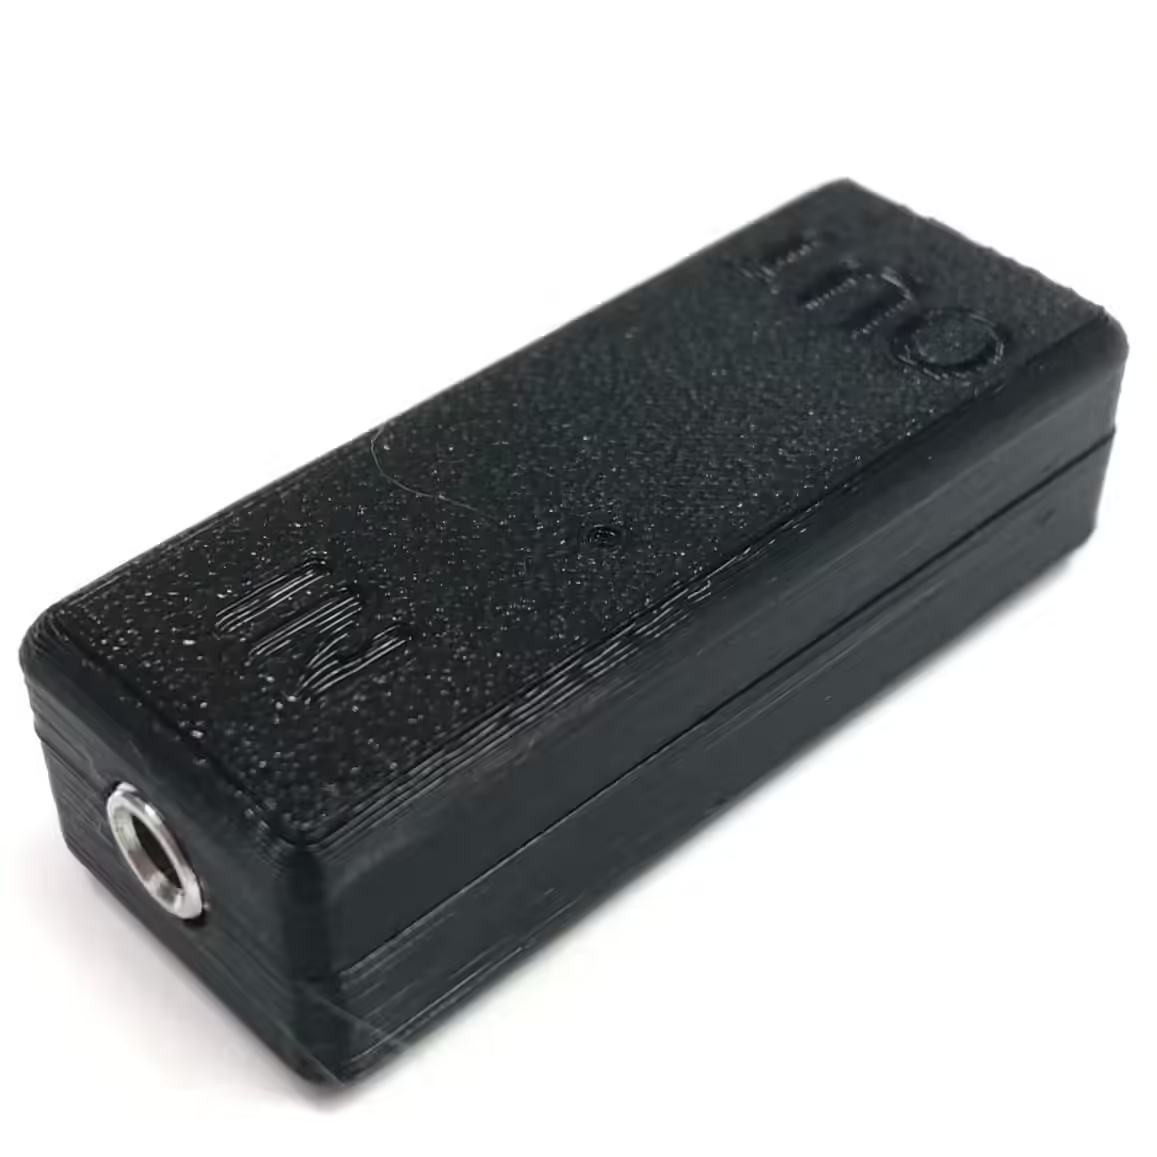
In addition to the Raspberry Pi Camera trigger, we are also launching a universal version that utilizes 3.5mm audio jacks for input instead of a GPIO header. This allows for a variety of input sensors to be utilized, such as limit switches, microphones, photogates, etc.
This version is available with an optional 3D printed protective case to protect it from the elements. If this device is intended to be used outside of any enclosure, the protective case is highly recommended.
Raspberry Pi Camera trigger — Perfect for Timelapse Photography
Creating timelapse videos of slowly changing scenes is a great way to bring them to life. Also known as hyperlapses, timelapses are made by taking a single image every so often, and then playing them back at a typical video framerate such as 24 or 30 frames per second. So, if one picture was taken every second, for a minute, you would end up with about 2 seconds worth of video. If you took one picture every minute, then a full hour would be played back in 2 seconds.
As you can see, you can really create the effect of speeding up time by using this technique. This is great for capturing things like clouds or stars moving across the sky, plants or flowers growing, construction sites evolving, or 3D prints magically forming on the printer’s build plate.

Software and USB Triggers
There are ways to trigger digital SLR cameras from a Raspberry Pi using software and a USB connection to your camera, if your camera supports this. If you’re using OctoPrint (highly recommended for 3D printing) then check out the Octolapse plugin. This is a great plugin that allows for a lot of customization of your timelapses, and supports using external software scripts to trigger your camera.
I found that using USB was not reliable for my older Canon 20d. The camera would not trigger each time, and so I was missing lots of frames. This really messes up a good timelapse video, and because these videos take so long to create, it can be very frustrating. More modern cameras may be better at this, your mileage may vary.
After one too many ruined timelapse videos due to missed trigger events, I decided that I needed a more reliable method to trigger my camera. The best method is to use the GPIO (General Purpose Input Output) pins on the Pi to directly command a shutter release. This works exactly the same as a standard remote shutter release, or a fancier programmable shutter release, but with the advantage of it being automatically controlled by the Raspberry Pi using a very simple python script. Octolapse runs this script whenever it needs to take an image.
Here’s the script I use:
#!/usr/bin/env python
from time import sleep
import RPi.GPIO as GPIO
i = 0
GPIO.setmode(GPIO.BCM)
GPIO.setwarnings(False)
GPIO.setup(21, GPIO.OUT)
GPIO.output(21, True)
sleep(0.3)
GPIO.output(21, False)
sleep(0.1)
A Simple Hardware Interface
In order to interface the Raspberry Pi’s
GPIO to the camera, I created a simple
optocoupler device. This device isolates
the Raspberry Pi electronics from those of
the camera by using an LED and
phototransistor to transfer a signal. When
the Raspberry Pi sets the GPIO trigger pin
to HIGH, the optocoupler’s LED emits light,
which is received by the base of the
phototransistor. This allows current to flow
through the phototransistor and triggers
the camera’s shutter release. When the
GPIO pin is set to LOW, the LED stops
emitting light, and the phototransistor
stops allowing current to flow. Simple. E!ective. No batteries required.
The device connects to the last two GPIO pins on the header: pins 39 (Ground) and 40 (GPIO21). The design of the module allows it to sit nicely upside down on the Raspberry Pi, taking up minimal space. The 3.5mm connector points to the same side as the HDMI and power connectors. The image below shows the installed position of the device, and a 3.5mm jack connected to it.
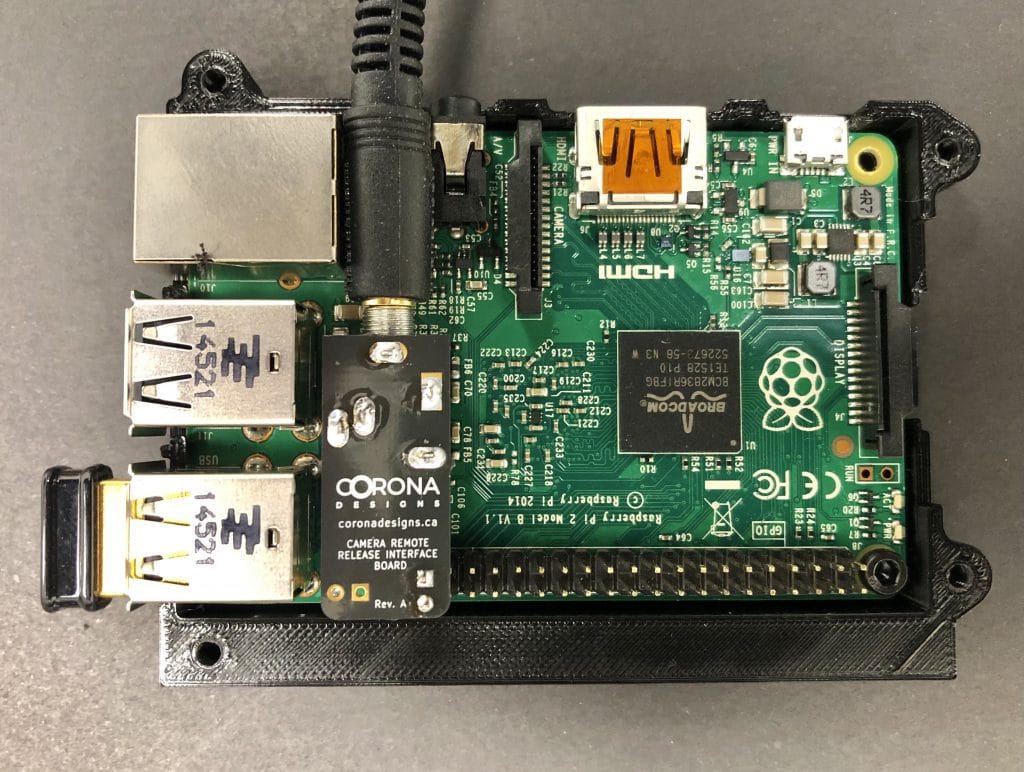
To connect the device to my camera, I use 3.5mm stereo audio plugs. These are cheap, easy to find and are robust. Depending on your camera, you may need an adapter. My Canon 20d uses a proprietary 3 pin connector. Luckily these adapters are also cheap and readily available.
Results
Overall, I’m very pleased with how this device turned out. It is simple, and plugs directly onto the Raspberry Pi’s GPIO pins. It is completely concealed within the RPi case. The script to trigger it is simple, and easily configured within the Octolapse plugin. The device has proven to be very reliable. I’ve not lost a single frame since I started using it.

Available for Purchase
Visit Corona Designs Shop to purchase this device or a more generic version with 3.5mm input and output jacks. Any purchases made are greatly appreciated and help support this site.


Hi! Is it possible to get a version of this that works in reverse? I’d like to have the RPi detect voltage input coming from a shutter release trigger. Happy to buy one of your devices and do some soldering myself if you can recommend the changes.
Thanks!
Hi, the universal version of the trigger (https://www.tindie.com/products/22666/) might work for you. It allows you to feed in a 5v signal, and the output will close the circuit between the two contacts which could be connected to two RPi GPIO pins (i.e. pins 1 and 3). You would need to wire two 3.5mm jacks to interface with it.
On the RPi pin 1 is 3.3v and pin 3 can be set as input. When the module output closes (after the shutter release is triggered), pin 3 should receive 3.3 volts from pin 1 and the RPi would read it as high/true.
This assumes your shutter release trigger is a typical (non-usb) trigger that is simply closing contacts when the buttons are pushed. Anything else would be more complicated. You will need to wire +5v source to one side of your shutter release so that it sends 5v to the module when the button is pushed. The module will need this power to function. Any voltage between 3 and 5 volts should work.
A 3.5mm jack wired to a 0.1″ female header or some dupont wires would allow you to connect to the RPi GPIO pins. Refer to the RPi header layout to make sure you find the right pins: https://pinout.xyz/
Hope this helps!