
With the recent news of Printrbot shutting their doors, I thought I’d write a post on how my Printrbot Simple Metal has performed for me over the years. The Simple is still the only 3D printer I own, and I think that’s a testament to its build quality, performance and its capabilities.
I purchased my Simple Metal in November 2015, so it’s about 3 years old now. As I was new to 3D printing at that time, I wasn’t too sure if I needed a heated bed, or what build volume I would really need. Of course now I know: bigger is always better, and a heated bed is a definite necessity. Luckily for me, I was able to work around the heated bed by building my own, and it’s been working great.
Design and Build Quality
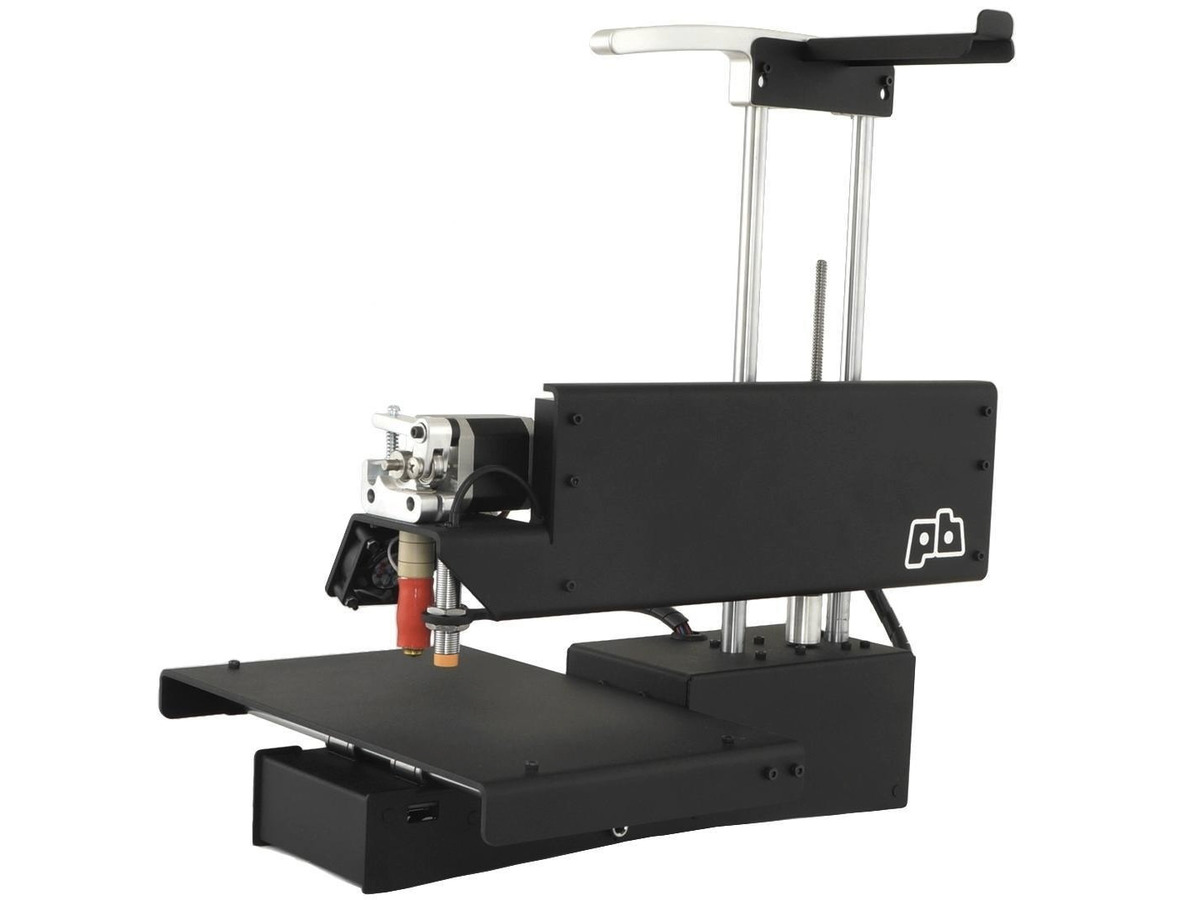
The Simple Metal is an all-metal design, which is pretty unique even for today’s technology. Printed parts are pretty common for many of today’s 3D printers, but there are none on the Simple Metal. The build quality is quite good, with tight fitting machined parts, solid and smooth guide rods and bearings, and a sleek and tidy metal frame to offer support and house the electronics. The build plate is a solid piece of bent aluminum, powder coated to match the finish of the rest of the printer.
The design incorporates a cantilevered Y axis arm, which simplifies the machine a bit and keeps it compact, but it also causes some print quality issues, more on that later. The electronics are housed below the build plate, in the metal base of the machine.
It would have been nice if Printrbot could have squeezed in a power on/off switch somewhere, and the micro SD card slot is pretty difficult to access, but both of these are minor gripes. The addition of an LCD screen would also be a welcome improvement.
Print Quality
I can’t say the print quality is stellar, but it is decent. The cantilevered Y axis arm is probably the biggest problem, and there isn’t much I can do about it. By design, it is not as rigid as it needs to be, so any forces acting on the Y axis could cause some irregularities in the print. With the Y axes fully extended, you can notice a visible displacement if you push on it slightly. This means that the best quality prints are made with the part placed as close to the main frame as possible. This minimizes the length of the cantilever of the Y axis. Of course, for larger prints, this is not going to make much difference.
Recently, I’ve noticed that the filament feed could be causing some horizontal banding issues/irregularities. I’m still looking into this.
Print Speed
Print speed is decent. The motors are more than powerful enough to print at 50+mm/s without skipping steps. I found the printer a bit noisy out of the box, mainly due to the stepper drivers being set to maximum, which is definitely overkill. After tuning the steppers, reducing their current on the various axes, the noise was greatly reduced, and with no impact on performance. Print speeds above 40mm/s are not recommended if you want good quality though. Anything higher and you start getting ringing and overshoot artifacts.
Z Banding
Z banding was noticeable and is due to a wobbly lead screw. There isn’t much I can do about the lead screw, so I added a stabilizer bar and adjusted print settings to compensate for it. Basically, using a layer height of 0.1984mm keeps the Z axis at the same orientation for each layer. This avoids the periodic horizontal bands that result if this is not done. I believe this is another issue attributed the cantilevered design of the Printrbot Simple.
Build Plate & Warping
Warping on the unheated bed was to be expected, and is pretty bad if you’re trying to print flat objects. Adding a heated bed after the fact is pretty easy to do, and is highly recommended. Warping was greatly reduced after I added the heated bed.
The stock aluminum build plate is not great. It is fairly flat, but the painted texture on it does not lead well to adhesion. I found that using blue painters tape (3M) wiped with some isopropyl alcohol makes a big difference. Adhesion with this method is so good, I’ve had parts not want to separate from the tape! It’s also cheap and easy to implement–no glue stick, hairspray, etc. needed. I find that I can usually use the tape for quite a few prints before it needs to be replaced.
Part Cooling
Lastly, the stock part cooling fan is not great. It is a 40mm radial fan that does not create much static pressure. If you try to duct it through a nozzle, it will barely produce any air flow. I lived with it for a couple of years, but then I decided to upgrade to a blower style fan. Since that upgrade, I have been much happier with it. With proper part cooling, the printer is capable of printing decent overhangs, bridges, etc.
Dimensional Accuracy
Most of my printing is for functional prints. That is, they are mainly machine parts, prototype robot components, etc. and not sci-fi figurines. To be useful as functional parts, the dimensional accuracy needs to be good. The Simple metal isn’t perfect in this regard, but it is consistent. For any dimension, the Simple prints them accurately, but with about +0.3mm extra on X and Y axis. I can live with this, as I usually have greater tolerances built into my part designs.
Upgrades
The Simple is pretty good out of the box, but a few upgrades make a big difference:
- As stated above, the addition of a heated bed is probably the best upgrade you can make.
- An improved part cooling nozzle and new blower fan make an improvement as well.
- I went the extra mile and created an improved horizontal spool holder and guide, as I noticed the spools don’t like to spin freely on the stock holder. (this could be an issue with the filament spools though).
Compared to Current Offerings
A lot has changed since the Simple Metal was released. It seems the Prusa style gantry printer design is the clear winner in terms of print quality and popularity. There are still some cantilevered printers on the market, but from my experience, this style will never be as good as a gantry.
The all-metal construction is still fairly unique. Most printers will use some 3D printed parts, or injection molded plastic parts to supplement their metal rails and save cost. While machined metal parts are definitely nice and robust, they are expensive and overkill in some respects. The use of 3D printed parts on a 3D printer is reasonable as they do not deal with high forces, and it also means you can easily upgrade them later when technology improves.
Conclusions
Overall, the Printrbot Simple Metal has served me well, and is still going strong. Yes, 3D printing technology has improved significantly beyond the Simple Metal, which was to be expected. There will always be new features to make your old gear seem inadequate—such is life! There are a few features I wish it had, like a LCD screen for local control, which seems to be the standard these days. This would make it easier even just to load filament or for maintenance purposes.
Quality and durability are always important, and the Printrbot has this in spades. After nearly three years of tinkering and use, the Simple has not broken on me (aside from a weird issue with the circuit board that was corrected under warranty, and some worn out belts). It has required some maintenance and upkeep, as does any printer.
As the old saying goes: you get what you pay for. In this case, the Printrbot Simple Metal was priced well compared to the competition, and has held its own over the years. I’ve definitely got my money’s worth out of this work horse, and I have no regrets.
It is sad to see Printrbot close, as they definitely were an influencer in the community and 3D printing market. They will be missed. However, it is exciting to see the market evolve, and the cost of 3D printers that can produce good quality prints is certainly dropping. This ultimately, is good for consumers and the industry.


Hi Rob,
Just read your long term review and found it very useful. I’m looking for a good starter 3D printer for my 13 yr old son and like the open source / mod-able nature of the Simple. It will offer him a lot of useful experience, I think.
I’ve been offered one for £200 refurbished by a reputable dealer. What do you think?
Phil
Honestly, for that price I’d recommend something like a new Ender 3. Printrbot no longer exists, so the Simple is no longer supported. The Ender 3 seems to have a large community of users and produces good quality prints from what I’ve seen (note that I’ve never used one). You lose the open source though.