
Corona Designs’ Raspberry Pi dSLR camera trigger is a very useful device to allow the Raspberry Pi to trigger an external camera. Either manually, or automatically, there are many ways to use the trigger. This post provides instructions on how to install the device, and configure software to trigger an external camera.
The trigger can be run manually from the command line, automatically from within the Octoprint plugin Octolapse, or even using the Rasbperry Pi’s scheduler software (cron) to take pictures at regular intervals (and even have blackout periods). Instructions on how to set up each of these methods are described below.
Hardware Installation

The Raspberry Pi dSLR camera trigger connects to the last two pins on the GPIO header. WIth the Raspberry Pi powered off, turn the trigger upside down, and plug the female header onto these last two pins as shown in the image below. This orientation is the most compact, although it does hide the LED trigger status indicator.
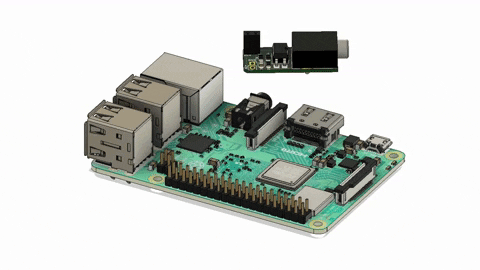
Once the trigger has been installed, the camera can be connected to the 3.5mm audio jack. A hole may need to be made in the case/enclosure to allow the camera cable to pass through.
The Trigger Script
A simple script is needed to trigger the camera as there is no built-in function on the Raspberry Pi to do this. A trigger script written in Python is shown below, and is also available here.
#!/usr/bin/env python
from time import sleep
import RPi.GPIO as GPIO

GPIO.setmode(GPIO.BCM)
GPIO.setwarnings(False)
GPIO.setup(21, GPIO.OUT)

GPIO.output(21, True)
sleep(0.3)
GPIO.output(21, False)
sleep(0.1)
Use the following commands to copy the script to the your home folder on the Raspberry Pi:
wget https://raw.githubusercontent.com/CoronaDesigns/examples/main/trigger.pyGive the script permission to execute (needed for OctoPrint & Octolapse to function correctly):
chmod +x trigger.pyHow it works
The script sets the Pi’s General Purpose Input/Output (GPIO) pin 21 to act as an output pin. This means we can change the state from HIGH to LOW programmatically. Note: GPIO 21 is physical pin 40, located at the end of the GPIO header.
When GPIO 21 is set HIGH, the camera is triggered and should take a picture at that instant. It is then held HIGH for 0.3 seconds using the sleep command before it is set back to LOW. This is to ensure a sufficiently long trigger pulse so that the camera does not miss the signal. A shorter sleep duration could be used, but this might cause the camera to miss the trigger, so use caution.
Manual Trigger using Command Line
Once the script has been copied to the home folder (or any folder of your choosing), it can be manually executed from within that folder with the following command:
python trigger.pyTo execute the script from any location (assuming it’s in the home directory), use:
python ~/trigger.pyor use the absolute reference:
python /home/pi/trigger.pyExecuting the script should cause the green LED to turn on for the 0.3 seconds, as programmed in the script, and the camera should have taken a picture (provided it is connected properly).
OctoPrint Configuration
OctoPrint has a built-in timelapse feature but this is intended for using web streaming devices, like webcams. For excellent 3D printing timelapses, use the Octolapse plugin. With this plugin, an external script can be used to trigger the camera.
Once the plugin has been installed, the external camera needs to be added in the Camera submenu of Octolapse Settings window.
- Open Octolapse Settings window and select the Camera tab.
- Click Add Profile… button
- Enter a name for the camera
- Set Camera Type as External Camera – Script
- Enter the path and filename of the python script from above: /home/pi/trigger.py
- Click the Test Script button and ensure the trigger’s LED lights, and the camera takes a picture
- Click the Save button at bottom of the window
Once the camera profile has been added, it can be selected from the plugin’s main interface.
Automatic Trigger Using Scheduler (cron)
Because the Raspberry Pi runs a Linux operating system, it already has a built-in scheduler that is useful for running tasks at predetermined times or intervals. The service that performs this is called cron, and it can also be used to trigger the camera at regular intervals (of minimum 1 minute resolution), or on specific times/dates or even certain days of the week.
To set up a cron job for triggering the camera, use the following command:
crontab -eThis opens up a text editor showing the cron jobs currently set up. Enter a new line and create a new cron job using the following format:
<minute> <hour> <day of month> <month> <day of week> <command>
- <minute> indicates what minute of the hour the job will run, and can be any number between 0-59 or * to run every minute.
- <hour> any number from 0-23 or * to run every hour
- <day of month> any number from 1-31 or * for every day of the month
- <month> any number from 1-12 or * for every month
- <day of week> can be 0-7 (0 or 7 are Sunday)
Each field is separated by a space, and lists or ranges can be specified for each field. For example:
* * * * * python /home/pi/trigger.pywill trigger the camera every minute, forever. The following job will trigger the camera every 10 minutes between the hours of 9am to 5pm, Monday to Friday.
*/10 9-17 * * 1-5 python /home/pi/trigger.pyOnce you’ve added your new cron job, exit the editor (in nano use ctrl + x and then y, then Enter to save and exit). Check that the crontab file has been updated by listing it using the command
crontab -lIf the crontab correctly shows the new job, then it will automatically execute the trigger accordingly.


