
Timelapse photography is an incredible technique that allows photographers to capture the passage of time in a visually stunning way. Whether it’s the movement of clouds across the sky, the hustle and bustle of a city, or the growth of a plant, timelapse sequences reveal patterns and motions that are otherwise imperceptible.
For those new to timelapse photography or looking to refine their technique, this MasterClass guide provides a great overview of essential shooting tips, camera settings, and creative applications.
Achieving high-quality timelapses requires precise control over the camera’s shutter to ensure consistent intervals and proper exposure. This is where a Raspberry Pi combined with the DSLR Camera Trigger from Corona Designs comes in. This device enables photographers to programmatically trigger their DSLR or mirrorless cameras using a Raspberry Pi, unlocking advanced automation features for a wide range of timelapse applications.
In this article, we’ll explore various creative and practical uses for this camera trigger, highlighting how it can enhance timelapse photography and why it’s an essential tool for both hobbyists and professionals.
Why Use a Raspberry Pi Camera Trigger?

1. Precision and Automation
Traditional intervalometers allow you to set fixed intervals between shots, but they often lack flexibility. The Raspberry Pi DSLR Camera Trigger from Corona Designs offers precise, programmable control, enabling photographers to fine-tune shooting schedules based on real-time conditions, such as light levels, weather data, time of day, or external sensors.
2. Remote Control and Monitoring
By connecting the trigger to a Raspberry Pi, photographers can control their cameras remotely over Wi-Fi or Bluetooth. This is especially useful for outdoor and astrophotography projects, where adjusting settings manually might be impractical.
3. Customizable Triggers
Unlike standard intervalometers, this device allows for custom triggers based on specific conditions. Want to capture a lightning storm? A motion sensor or light sensor can be integrated with the Raspberry Pi to trigger the shutter when lightning strikes.
4. Data Integration
The Raspberry Pi can collect data from various sensors (temperature, humidity, GPS, etc.), allowing for highly specialized timelapse sequences. This is ideal for scientific and environmental photography.
Creative and Practical Applications
Timelapse photography has many creative and practical applications. Here are a few examples—some may require additional hardware.
1. Astrophotography Timelapses

Capturing the night sky requires precise timing and long exposures. The Raspberry Pi DSLR Camera Trigger can help to:
- Automate star-trail photography by setting precise intervals or syncing with local sunset, sunrise, or moon positions.
- Capture meteor showers by triggering shots when sudden brightness changes occur.
- Sync with or control equatorial mounts to ensure consistent exposures without star trails.
With the ability to integrate with weather data, the camera can also adjust settings dynamically based on cloud cover or humidity levels.
2. Cityscapes and Traffic Timelapses
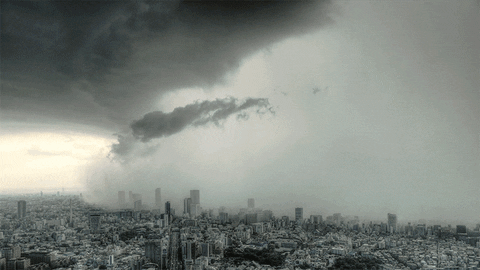
Urban environments offer a wealth of motion that can be beautifully condensed into a timelapse sequence:
- Capture severe weather events or the transformation of a skyline from day to night.
- Monitor traffic flow over bridges and highways.
- Create hyperlapse videos by moving the camera between shots using a motorized slider controlled by the Raspberry Pi.
With the ability to control multiple cameras or integrate GPS data, you can even map out large-scale projects showing the changing dynamics of a city over time.
3. Construction and Engineering Timelapses
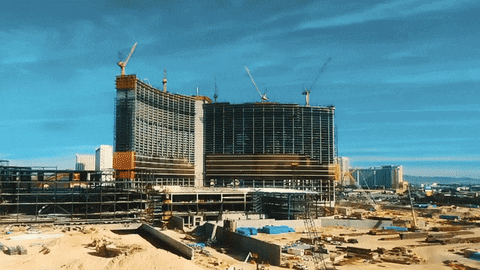
Long-term construction timelapses require reliable automation. The Raspberry Pi DSLR Camera Trigger ensures:
- Consistent shot intervals for weeks or months.
- Remote access for monitoring without needing on-site visits.
- Power-efficient operation using solar panels or battery packs.
For major engineering projects, integrating weather and environmental sensors can help document how conditions affect progress.
4. Nature and Wildlife Timelapses
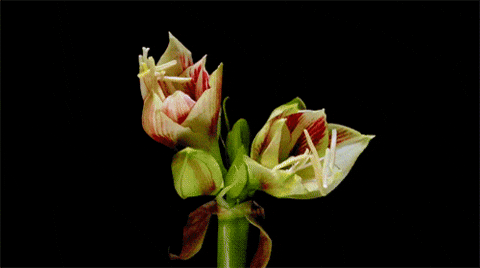
Nature timelapses are among the most breathtaking photography projects:
- Record the changing seasons in a single frame sequence.
- Capture flowers blooming or leaves changing color.
- Monitor wildlife behavior with motion-activated triggers.
By using infrared sensors or AI object recognition on the Raspberry Pi, the system can even be programmed to trigger only when an animal is in the frame.
5. Scientific and Educational Use

Researchers often use timelapse photography to study natural phenomena. The Raspberry Pi DSLR Camera Trigger can be deployed for:
- Monitoring glacier movement in climate studies.
- Observing plant growth in botany experiments.
- Capturing time-based experiments in physics and chemistry labs.
Its ability to integrate with external data sources makes it a powerful tool for scientific documentation.
6. Event and Festival Timelapses
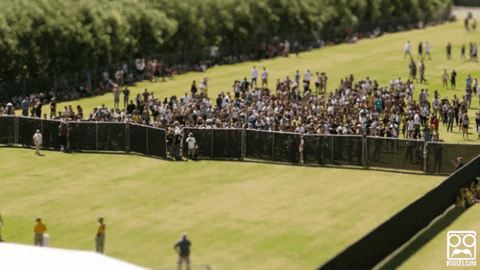
Capturing large-scale events such as concerts, parades, or festivals requires automation to ensure smooth, consistent timelapse sequences. By integrating multiple cameras controlled by Raspberry Pis, you can:
- Cover different angles without human intervention.
- Sync shots across multiple locations using networked triggers.
- Adjust intervals dynamically based on crowd density or stage lighting.
This makes it easier to create professional-quality event recaps with minimal manual effort.
How to Set Up the Raspberry Pi DSLR Camera Trigger
Setting up the device is straightforward:
- Connect the Trigger to the Raspberry Pi – The trigger interfaces with the Pi’s GPIO pins and sends commands to the DSLR via its remote shutter port.
- Install the Software – Using Python or shell scripts, you can write simple programs to control shooting intervals and integrate sensor data.
- Configure Remote Access – Set up Wi-Fi or Bluetooth control to manage your timelapse remotely.
- Deploy and Automate – Place your camera in the desired location, power up the system, and let automation take over.
A full setup guide is available on the trigger’s product page, making it easy to get started.
Why Choose the Raspberry Pi DSLR Camera Trigger?
Unlike basic intervalometers, a Raspberry Pi combined with Corona Designs’ Raspberry Pi DSLR Camera Trigger offers:
- Full programmability – Modify settings on the fly using scripts.
- Remote access – Control your camera from anywhere.
- Sensor integration – Automate based on environmental data.
- Reliability – Ideal for long-term timelapse projects.
Whether you’re a professional photographer, scientist, or hobbyist, this device empowers you to take your timelapse photography to the next level.
Final Thoughts
Timelapse photography is a powerful way to tell stories, visualize change, and capture the world in ways that static images or real-time video cannot. With the Raspberry Pi DSLR Camera Trigger, photographers gain unparalleled control, flexibility, and automation for their projects.
If you’re looking to push the boundaries of your timelapse work, invest in this innovative trigger and start capturing time like never before. Check it out today and unlock the full potential of programmatic photography!


